0%

SSL 自签名证书

X.509 格式标准

X.509:这是一种公钥证书的格式格式标准(
https://zh.wikipedia.org/wiki/X.509),详情参考 RFC5280

编码格式

  • PEM:Privacy Enhanced Mail
    文本格式,Apache 和 Unix-like 服务器偏向使用这种编码格式。查看 PEM 格式的证书(可以包含私钥):
    openssl x509 -in certificate.pem -text -noout

    • DER: Distinguished Encoding Rules
      二进制格式, Java 和 Windows 服务器偏向使用这种编码格式。查看 DER 格式的证书(单纯的证书,不可包含私钥):
      openssl x509 -in certificate.der -inform der -text -noout

PEM 转 DER:
openssl x509 -in cert.crt -outform der -out cert.der

DER 转 PEM:
openssl x509 -in cert.crt -inform der -outform pem -out cert.pem

注:

  1. 查看/转换密钥(公钥或者私钥)文件则使用 openssl rsa
  2. 查看/转换的是 CSR 文件则使用 openssl req

文件后缀名

  • crt,certificate 的缩写,Unix-like 证书文件的常见后缀名,通常是 PEM 编码。
  • cer,也是 certificate 的缩写,Windows 证书文件的常见后缀名,通常是 DER 编码。
  • key, 通常是公钥或者私钥文件的后缀名。
  • csr,Certificate Signing Request,证书签名申请文件后缀名。
  • pfx/p12,predecessor of PKCS#12,将证书和私钥存放在一个文件中,使用 DER 编码。 通常是 IIS 使用,Unix 系服务器通常证书和私钥是放在不同的文件中。
  • JKS,Java Key Storage,通常用在 tomcat 中,Java 提供 keytool 工具支持将 pfx/p12 转换成 JKS:keytool -importkeystore -srckeystore test.pfx -srcstoretype PKCS12 -deststoretype JKS -destkeystore test.jks

PEM <--> pfx/p12

Unix 系的 PEM 证书转 pfx/p12 格式证书:
openssl pkcs12 -export -in certificate.crt -inkey privateKey.key [-certfile CACert.crt] -out certificate.pfx

反过来:
openssl pkcs12 -in certificate.pfx -nodes -out certificate.pem

因为 certificate.pem 是一个同时包含证书和私钥的 PEM 证书,进一步可以通过下面命令分离成单独 PEM 证书和私钥 2 个文件:
openssl rsa -in certificate.pem -out privateKey.key
openssl x509 -in server.pem -out certificate.crt

生成证书

自签名证书( x.509 v1)

自己签署的证书,没有 CA 可以证明其有效性,无法被吊销。由于大多数移动平台不支持使用自签名证书,因此不推荐使用。用下面方法可以生成 x.509 v1 版本的自签名证书。

  1. 生成 RSA 私钥(不加密的私钥):

    openssl genrsa -out server.key 1024

    注:通过 man genrsa 查看使用手册。如果证书要使用在 Nginx 上,为避免每次 nginx reload ssl 都要手动输入口令,这里生成的私钥不加密。

  2. 创建证书签名申请(CSR, Certificate Signning Request):

    openssl req -new -key server.key -out server.csr

  3. 使用前面生成的私钥对 CSR 进行签名生成自签名证书:

    openssl x509 -req -days 3650 -in server.csr -signkey server.key -out server.crt
Read more »

KVM 磁盘缓存模式

本笔记内容无原创,整理自如下资料:

Cache modes

KVM 目前支持的磁盘缓存模式主要有 none,writethrough,writeback,directsync,unsafe 这 5 种。后面 2 种通常很少使用到。

none

  • I/O from the guest is not cached on the host, but may be kept in a writeback disk cache. Use this option for guests with large I/O requirements.(guest 使用 writeback, host 不使用 page cache,相当于 guest 直接访问主机磁盘。)

这种模式下虚拟机磁盘镜像文件或者块设备会使用 O_DIRECT 语义, 则 host 的 page cache 被绕过, I/O 直接在 qemu-kvm 的用户空间 buffers 和 host 的存储设备间发生。因为实际存储设备可能在写数据放到写队列后就上报写完成,虚拟机上的存储控制器被告知有回写缓存(writeback cache), 所以 guest 需要下发刷盘(flush)命令来保证数据一致(落盘)。相当于直接访问 host 磁盘,性能不错。

This mode causes qemu-kvm to interact with the disk image file or block device with O_DIRECT semantics, so the host page cache is bypassed and I/O happens directly between the qemu-kvm userspace buffers and the storage device. Because the actual storage device may report a write as completed when placed in its write queue only, the guest’s virtual storage adapter is informed that there is a writeback cache, so the guest would be expected to send down flush commands as needed to manage data integrity. Equivalent to direct access to your hosts’ disk,performance wise.

writethrough

  • I/O from the guest is cached on the host but written through to the physical medium. (guest 使用 wirtethrough, host 使用 page cache。)

这种模式下会为每次写操作执行 fdatasync(原文是 fsync 与后面 O_DSYNC 不太一致), 是一种安全的缓存模式,不用担心丢失数据,但同时也比较慢。这种模式下虚拟机磁盘镜像文件或者块设备被设置成 O_DSYNC 语义, 必须等待所有写数据落盘以后才上报写完成。 host 的 page cache 工作在所谓的 writethrough 模式。guest 的存储控制器会被告知没有 writecache, 所以 guest 不必下发 flush 命令来保证数据一致。存储设备的行为好像是透过缓存(writethrough cache)。

Writethrough make a fsync for each write. So it’s the more secure cache mode, you can’t loose data. It’s also the slower. This mode causes qemu-kvm to interact with the disk image file or block device with O_DSYNC semantics, where writes are reported as completed only when the data has been committed to the storage device. The host page cache is used in what can be termed a writethrough caching mode. The guest’s virtual storage adapter is informed that there is no writeback cache, so the guest would not need to send down flush commands to manage data integrity. The storage behaves as if there is a writethrough cache.

Read more »

v2ray + Nginx + TLS

安装 v2ray

  1. 安装 v2ray 最新版本:

bash <(curl -L -s https://install.direct/go.sh)

  1. 编辑 v2ray 配置文件 /etc/v2ray/config.json,这个配置文件简单启用 2 个传输通道,分别是 port 8081 上的 websocket 和 port 8082 上的 mkcp,其他更多配置请参考官方文档:
1
2
3
4
5
6
7
8
9
10
11
12
13
14
15
16
17
18
19
20
21
22
23
24
25
26
27
28
29
30
31
32
33
34
35
36
37
38
39
40
41
42
43
44
45
46
47
48
49
50
51
52
53
54
55
56
57
58
59
60
61
62
63
64
65
66
67
68
69
70
71
72
73
74
75
76
{
"log": {
"access": "/var/log/v2ray/access.log",
"error": "/var/log/v2ray/error.log",
"loglevel": "warning"
},
"dns": {},
"stats": {},
"inbounds": [{
"tag": "in-0",
"settings": {
"clients": [{
"id": "xxx",
"alterId": 64,
"level": 1
}
]
},
"streamSettings": {
"network": "ws",
"wsSettings": {
"path": "/ray"
},
"security": "none"
},
"listen": "127.0.0.1",
"port": 8081,
"protocol": "vmess"
}, {
"tag": "in-1",
"settings": {
"clients": [{
"id": "xxx",
"alterId": 64,
"level": 1
}
]
},
"streamSettings": {
"network": "kcp",
"kcpSettings": {
"header": {
"type": "dtls"
}
},
"security": "none"
},
"port": 8082,
"protocol": "vmess"
}
],
"outbounds": [{
"tag": "direct",
"settings": {},
"protocol": "freedom"
}, {
"tag": "blocked",
"settings": {},
"protocol": "blackhole"
}
],
"routing": {
"rules": [{
"type": "field",
"ip": [
"geoip:private"
],
"outboundTag": "blocked"
}
],
"domainStrategy": "AsIs"
},
"policy": {},
"reverse": {},
"transport": {}
}
Read more »

What is MongoDB?

MongoDB is a document database with the scalability and flexibility that you want with the querying and indexing that you need.

Stores data in flexible, JSON-like documents.

Document => Collection => Database

ref: what-is-mongodb).

Data Type

BSON vs JSON

BSON [bee · sahn]), short for Binary JSON, is a binary-encoded serialization of JSON-like documents.

  1. 继承自 JSON,具备 JSON 的通用性与 schema-less(例如与 Protocol Buffers 比较);

  2. 扩展了 JSON 的数据类型,提供了 JSON 没有的一些数据类型,例如: Date 和 BinData(byte array,有了这种类型以后就不需要像 JSON 一样需要先 base64 编码再存储,减少了计算和存储的开销);

  3. BSON 的存储结构相比较 JSON 有更快的遍历速度;

  4. BSON 的存储有数据类型的支持,字段更新的时候更快更方便。JSON 的存储由于没有数据类型的支持,字段的更新需要移动文档的内容,操作代价大。

BSON Spec ref:bsonspec)

头部存有数据结构的长度,有数据类型的支持,遍历起来快,不用像 JSON 一样进行各种复杂的数据结构匹配。

1
2
3
4
5
6
7
8
9
10
11
12
13
14
15
16
17
18
{"hello": "world"}

\x16\x00\x00\x00 // total document size
\x02 // 0x02 = type String
hello\x00 // field name
\x06\x00\x00\x00world\x00 // field value
\x00 // 0x00 = type EOO ('end of object')

{"BSON": ["awesome", 5.05, 1986]}

\x31\x00\x00\x00
\x04BSON\x00
\x26\x00\x00\x00
\x02\x30\x00\x08\x00\x00\x00awesome\x00
\x01\x31\x00\x33\x33\x33\x33\x33\x33\x14\x40
\x10\x32\x00\xc2\x07\x00\x00
\x00
\x00

BSON Types

BSON is a binary serialization format used to store documents and make remote procedure calls in MongoDB.

ref:https://docs.mongodb.com/v2.6/reference/bson-types/

Type Number Notes
Double 1
String 2
Object 3
Array 4
Binary Data 5
Undefined 6 deprecated
Object id 7
Boolean 8
Date 9
Null 10
Regular Expression 12
JavaScript 13
Symbol 14 deprecated
JavaScript (with scope) 15
32-bit integer 16
Timestamp 17
64-bit integer 18
Min key 255 Query with -1.
Max key 127
Read more »

引言

网站安全不外乎就是信息安全的三个基本要点,简单来说就是:

  1. 机密性,网站要保护用户的隐私数据不被窃取,账号不被盗用,面对的主要的攻击方式是植入木马;
  2. 可用性,网站要保证其服务是可用的,面对的主要的攻击方式是DOS和DDOS;
  3. 完整性,网站要确保用户请求信息或数据不被未授权的篡改或在篡改后能够被迅速发现,面对主要的攻击方式是XSS和CSRF;

这篇笔记主要分析 Tornado 对 CSRF 的防范。众所周知 HTTP 协议是一个无状态协议,这便意味着每次请求都是独立的,要在两次请求之间共享数据(或者称为保持会话状态)便必须在请求时重传数据。 Cookie 和 Session 分别是客户端和服务端保持会话状态的机制。 Tornado Web 框架中已经默认对 Cookie 提供了支持,而对 Session 却没有提供内置的 Session 实现。我猜测这是因为考虑到现在的 Web 应用往往比较复杂并需要分布式存储 Session 数据,若要实现一个大而全 Session 来满足复杂的应能用场景基本上不可能,干脆就不内置而交由应用去自行根据需求来实现。

通常 Cookie 的使用不当往往导致安全问题, Tornado 在设计时便考虑到这个问题,为此内置 secure cookies 来阻止客户端非法修改 cookie 数据,以此来防范常见的 cookie 安全漏洞。Tornado 官方文档中专门用了一节 《认证和安全》 来介绍相关内容(中文翻译:https://tornado-zh.readthedocs.org/zh/latest/guide/security.html ),在网上也有很多介绍这方面的资料,比如:http://demo.pythoner.com/itt2zh/ch6.html#ch6-2-1 就写的很好,所以这篇笔记不再从 “如何使用 secure cookies 来编写安全应用” 的角度来讨论,而是结合代码分析实现原理。

Secure Cookies

Cookies 是不安全的,可以被客户端轻易修改和伪造,Tornado 的 Secure Cookies 使用加密签名来验证 Cookie 数据是否被非法修改过,签名后的 Cookie 数据包括时间戳、 HMAC 签名和编码后的 cookie 值等信。tornado.web.RequestHandler 通过 set_secure_cookie()get_secure_cookie() 方法来设置和获取 Secure Cookies,因为 HMAC 签名密钥是由 tornado.web.Application 实例来提供的,所以在实例化 tornado.web.Application 时必须在 settings 中提供 cookie_secret 参数才能使用安全 Cookies。否则,self.require_setting("cookie_secret", "secure cookies") 会抛出未设置 cookie_secret 异常。

cookie_secret 参数是一个随机字节序列,用来制作 HMAC 签名,可以使用下面的代码来生成:

1
2
>>> import base64, uuid
>>> base64.b64encode(uuid.uuid4().bytes + uuid.uuid4().bytes)

Read more »

RequestHandler 异常处理

之前的笔记中已经提到过 RequestHandler_execute 方法完全处于一个异常处理块中,所以异常处理入口 _handle_request_exception 便在这里开始处理流程。

1
2
3
4
5
6
7
8
9
10
11
12
13
14
15
16
17
18
19
20
def _handle_request_exception(self, e):
if isinstance(e, Finish):
# Not an error; just finish the request without logging.
if not self._finished:
self.finish()
return
self.log_exception(*sys.exc_info())
if self._finished:
# Extra errors after the request has been finished should
# be logged, but there is no reason to continue to try and
# send a response.
return
if isinstance(e, HTTPError):
if e.status_code not in httputil.responses and not e.reason:
gen_log.error("Bad HTTP status code: %d", e.status_code)
self.send_error(500, exc_info=sys.exc_info())
else:
self.send_error(e.status_code, exc_info=sys.exc_info())
else:
self.send_error(500, exc_info=sys.exc_info())

由前面的代码可以看到,与请求异常处理相关的自定义异常类型是 FinishHTTPError,方法有 log_exceptionsend_error

_handle_request_exception 的处理流程中,除去 Finish 类型外的所有异常都需要调用 log_exception 方法来记录异常信息。如果响应没有结束,还需要尝试向客户端响应异常信息(只所以说是 “尝试”,是因为我们无法修改已经 flush 到客户端的数据,只能在尚未 flush 过数据时响应异常信息)。

Finish

Finish 是一个特别的自定义异常类型,为应用程序提供一种提前结束请求的方式。因抛出 Finish 而结束的请求不会输出一个异常响应(即不被视为请求处理异常)。如代码中所示,在 RequestHandler 请求处理过程中抛出 Finish 时,如果没有调用 finish 则调用 finish 结束请求,并立即返回,结束处理流程。这样一来后续与异常处理相关的方法就不会被调用,也就不会影响到已经 flush 的内容。

Read more »

引言

这部分笔记主要是简单分析 Tornado 中 Http 响应相关的代码,但没有涉及到安全相关的 cookie 实现以及 HTML 模板引擎。

HTTPConnection

tornado.httputil 模块定义了 Tornado 的响应接口 HTTPConnection

1
2
3
4
5
6
7
8
9
10
11
12
13
14
15
16
17
18
19
20
21
22
23
24
25
26
27
28
29
30
31
class HTTPConnection(object):
"""Applications use this interface to write their responses.

.. versionadded:: 4.0
"""
def write_headers(self, start_line, headers, chunk=None, callback=None):
"""Write an HTTP header block.

:arg start_line: a `.RequestStartLine` or `.ResponseStartLine`.
:arg headers: a `.HTTPHeaders` instance.
:arg chunk: the first (optional) chunk of data. This is an optimization
so that small responses can be written in the same call as their
headers.
:arg callback: a callback to be run when the write is complete.

Returns a `.Future` if no callback is given.
"""
raise NotImplementedError()

def write(self, chunk, callback=None):
"""Writes a chunk of body data.

The callback will be run when the write is complete. If no callback
is given, returns a Future.
"""
raise NotImplementedError()

def finish(self):
"""Indicates that the last body data has been written.
"""
raise NotImplementedError()

之前已经分析过的 tornado.http1connection.HTTP1Connection 是该接口的实现(另一个实现是 tornado.wsgi._WSGIConnection)。上述定义的三个接口方法注释很完整,简单来说:

  1. write_headers 方法用于写 Http 消息头,一次响应应该只调用一次。其中可选参数 chunk,是消息体数据,在响应数据较少的情况下灰常有用,很多时候我们都是调用一次该方法完成写消息头和消息体,而不会去单独调用 write 方法单独写消息体。

  2. write 方法用于写消息体。

  3. finish 方法用于告诉接口此次请求响应结束。

Read more »

HTTPServerRequest 解析 message-body

Tornado 对每次请求都会创建一个 tornado.httputil.HTTPServerRequest 实例。由之前的分析我们知道 Http Request 的 “Request-Line” 和头域解析工作已经在 tornado.http1connection.Http1Connection 中完成,所以在 tornado.httputil.HTTPServerRequest 中的主要工作就是对请求参数的解析,而其中对 message-body 的解析相比较 query 要复杂一些。

下面是 HTTPServerRequest 解析 message-body 的方法代码,其中解析结果存放在 body_argumentsfiles 字段中(注:字段 arguments 存放所有请求参数,包括 query 参数和 body 参数,对 query 的解析已经在 HTTPServerRequest 的构造函数中完成)。

1
2
3
4
5
6
7
8
def _parse_body(self):
parse_body_arguments(
self.headers.get("Content-Type", ""), self.body,
self.body_arguments, self.files,
self.headers)

for k, v in self.body_arguments.items():
self.arguments.setdefault(k, []).extend(v)

由代码可知,_parse_body 方法对 body 解析是委托模块函数 parse_body_arguments 完成的。

parse_body_arguments 函数

Http 协议是以ASCII码传输,建立在 TCP/IP 协议之上的应用层协议。协议把 Http 请求分成了三部分:请求行,请求头,消息体。协议没有规定消息体中数据的编码方式。在浏览器 Form 表单 POST 提交时,如没有指定 enctype 属性的值,默认使用 application/x-www-form-urlencoded 方式编码提交,该编码方式不能用于文件上传。通常使用表单上传文件时使用 multipart/form-data 方式编码提交,这是浏览器原生支持的,就目前而言原生 Form 表单也只支持这两种方式。另外还有 application/jsontext/xmltext/plaintext/html 等等编码方式,不过这些方式大多都用在 Response 上。实际上只要服务器支持,任何一种编码都可以在请求中使用,我觉得通过 application/json 编码请求数据在 RESTful 接口中非常有用。

tornado.httputil 模块中的 parse_body_arguments 函数默认支持解析 application/x-www-form-urlencodedmultipart/form-data 编码的 body 数据。

1
2
3
4
5
6
7
8
9
10
11
12
13
14
15
16
17
18
19
20
21
22
23
24
25
26
27
28
29
30
31
32
33
34
35
36
def parse_body_arguments(content_type, body, arguments, files, headers=None):
"""Parses a form request body.

Supports ``application/x-www-form-urlencoded`` and
``multipart/form-data``. The ``content_type`` parameter should be
a string and ``body`` should be a byte string. The ``arguments``
and ``files`` parameters are dictionaries that will be updated
with the parsed contents.
"""
# 只支持解码后(或无编码)的 body 数据。实际上在 Tornado 中有专门的
# `_GzipMessageDelegate` 类支持 `gzip` 解码,body 数据都通过其解码后再调用
# `parse_body_arguments` 函数。参见 `Http1Connection.read_response` 实现。
# `_GzipMessageDelegate` 处理请求后会删除其中的 'Content-Encoding' 头域,用
# 'X-Consumed-Content-Encoding' 头域代替。
if headers and 'Content-Encoding' in headers:
gen_log.warning("Unsupported Content-Encoding: %s",
headers['Content-Encoding'])
return
if content_type.startswith("application/x-www-form-urlencoded"):
try:
uri_arguments = parse_qs_bytes(native_str(body), keep_blank_values=True)
except Exception as e:
gen_log.warning('Invalid x-www-form-urlencoded body: %s', e)
uri_arguments = {}
for name, values in uri_arguments.items():
if values:
arguments.setdefault(name, []).extend(values)
elif content_type.startswith("multipart/form-data"):
fields = content_type.split(";")
for field in fields:
k, sep, v = field.strip().partition("=")
if k == "boundary" and v:
parse_multipart_form_data(utf8(v), body, arguments, files)
break
else:
gen_log.warning("Invalid multipart/form-data")

application/x-www-form-urlencoded

这是浏览器原生表单 POST 默认的编码方式,GET 默认的请求数据编码方式也是它,差别就在于 GET 时编码后的数据是放在 URL 中一起发送给服务器的,并且 URL 有一个 2048 字符长度的限制;POST 时编码后的数据是放在 Message-Body 中发送给服务器的,协议上并没有限制长度。

Read more »

引言

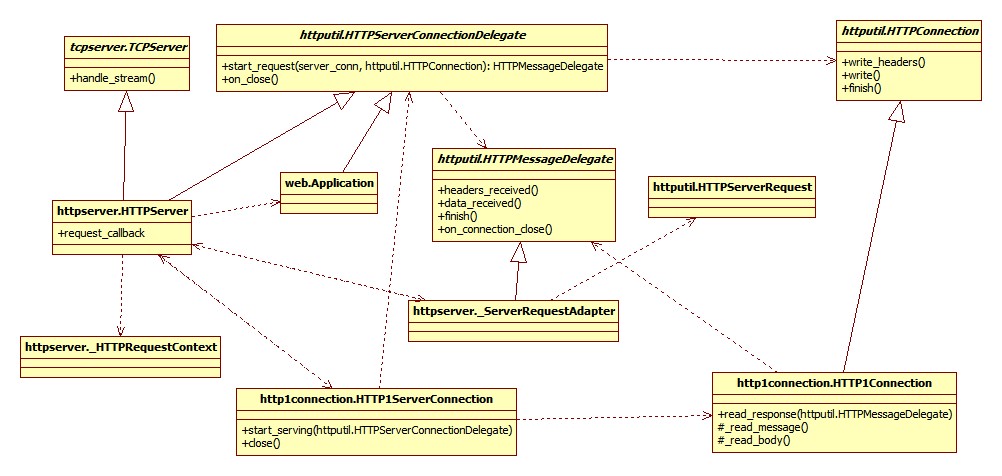
在前面 Tornado 的分析文章中已经详细介绍了 HttpServer 接收处理客户端 Http 连接请求,并将请求委托给请求回调(即 HttpServer.request_callback 字段,由 HttpServer 的构造参数来完成初始化)处理的流程。基于 HttpServer 的支持,tornado.web 模块为我们提供了一个简单的 Web 框架,该框架支持路由请求到对应的(自定义/默认)请求处理器(RequestHandler)并自带一个简易的 HTML 模板引擎。在分析 tornado.web 模块的设计之前,先通过一张图来回顾一下 HttpServer 的处理流程,看看 web.tornado 提供的框架是如何获得支持的。

由上图可知:

  1. httpsever.HttpServer 继承自 tcpserver.TCPServer 并覆写了 handle_stream(stream, address) 方法。

  2. httpsever.HttpServer.handle_stream(stream, address) 方法中将请求相关的 IOStream、地址和协议描述(http/https)保证成 httpsever._HTTPRequestContext 实例以构建 http1connection.HTTP1ServerConnection 实例,并调用 Http1ServerConnection.start_serving 方法启动请求处理。

  3. http1connection.HTTP1ServerConnection 是一个支持 Http/1.x 的服务端抽象连接类型,也就是说能支持 Http/1.1 的长连接。在该连接实例服务周期中(实现在其 _server_request_loop 方法的 while 循环),其内部对于每一次 Http 请求会生成一个 http1connection.HTTP1Connection 实例。

    • http1connection.Http1ServerConnection.start_serving(delegate:httputil.HTTPServerConnectionDelegate) 方法要求接收一个 httputil.HTTPServerConnectionDelegate 实例,该实例的 start_request(server_conn, request_conn:HTTP1Connection) 方法返回一个 httputil.HTTPMessageDelegate 实例,该实例将与 http1connection.HTTP1Connection 实例配合处理 Http 请求的各个阶段。

    • http1connection.HTTP1Connectionhttputil.HTTPConnection 的 Http/1.x 子类实现,是每次 Http 连接请求的抽象,提供了读取请求和数据和发送响应数据的接口。http1connection.HTTP1ServerConnection 抽象了一个服务端的物理连接,http1connection.HTTP1Connection 则抽象了每次 Http 请求的连接,这样一来前者就可以基于同一个物理连接处理多个 Http 请求,也就是支持了 Http 协议要求的长连接。

  4. httpsever.HttpServer 同时继承自 httputil.HTTPServerConnectionDelegate,所以它能作为 http1connection.HTTP1ServerConnection.start_serving() 方法的参数为其提供实际的请求处理。对请求的处理工作 httpsever.HttpServer 实际上是委托给其内部的 request_callback 字段来进行,该字段在 httpsever.HttpServer 构造时初始化。在 Tornado v4.0 之前的版本中,request_callback 是一个以 httputil.HTTPServerRequest 作为参数的回调对象,v4.0 之后引入 httputil.HTTPMessageDelegate 类型,随之 request_callback 改为支持 httputil.HTTPMessageDelegate 实例。为了向后兼容,httpsever.HttpServer.start_request 方法返回一个 httpserver._ServerRequestAdapter 类型实例。httpserver._ServerRequestAdapter 是一个对象适配器,它负责将之前的回调对象(适配者)适配到 httputil.HTTPMessageDelegate 类型。

  5. web.Application 继承自 httputil.HTTPServerConnectionDelegate,可作为请求连接处理回调对象传递给 httpsever.HttpServer, 作为其 request_callback 字段负责处理请求。

到这里,httpsever.HttpServer 的整个处理过程基本回顾了一遍,后面处理将转到 web.Application ,开始进入 Tornado Web Framework 的处理流程。

Read more »

守护进程介绍

本笔记内容主要参考自:《Advanced Programming in The Unix Environment 3rd edition》 第 13 章第 3 小节。

守护进程是一类长时间运行的进程,一般随操作系统启动运行直到系统关闭而停止(也可以由 crond 启动,或者由用户终端 Shell 启动)。因为没有关联的控制终端,所以我们称其在后台运行,这也是守护进程最重要的特性。另一个重要的特性是守护进程必须与其运行前的环境隔离开。参考 《Advanced Programming in The Unix Environment》 第 13 章内容,编程实现守护进程有一些通用的设计规范。

守护进程编码设计规范

这里将介绍一些编码规范,这些规范将阻止守护进程与其运行前环境产生一些不必要的交互。

  1. Call umask to set the file mode creation mask to a known value, usually 0. The inherited file mode creation mask could be set to deny certain permissions. If the daemon process creates files, it may want to set specific permissions. For example, if it creates files with group-read and group-write enabled, a file mode creation mask that turns off either of these permissions would undo its efforts. On the other hand, if the daemon calls library functions that result in files being created, then it might make sense to set the file mode create mask to a more restrictive value (such as 007), since the library functions might not allow the caller to specify the permissions through an explicit argument.

    调用 umask 将文件创建掩码设置为一个值,通常是 0 。因为守护进程从父进程继承而来的 “文件创建掩码” 可能会屏蔽某些特定的文件操作权限。如果守护进程想要创建文件,那么便需要设置特定的文件操作权限。例如,守护进程想要创建允许用户组读和写权限的文件,继承而来的 “文件创建掩码” 屏蔽了这个权限,则创建操作不会成功。另一方面,如果后台进程调用的库函数会创建文件,但是库函数又不允许调用者通过一个明确的参数来指定文件的权限,为了安全起见将 “文件创建掩码” 设置为一个更严格的值(比如 007 )是非常有意义和必要的。(注:默认情况下的 umask 值是 022 (可以用 umask 命令查看),此时你建立的文件默认权限是 644 (6-0,6-2,6-2),建立的目录的默认权限是 755 (7-0,7-2,7-2)。使用 umask(0) 修改 “文件创建掩码” ,保证进程拥有文件的读写权限,这个操作很危险将导致新建的文件权限为 0666/world-writable 。这个操作通常用于文件创建者和修改者不是同一个用户的场景,比如:你需要创建一个文件,该文件后续会被 Web Server 修改,而 Web Server 使用的是另外一个用户运行。这种情况下为 Web Server 写文件的目录 Set Group ID() 是个不错的选择。)

  2. Call fork and have the parent exit. This does several things. First, if the daemon was started as a simple shell command, having the parent terminate makes the shell think that the command is done. Second, the child inherits the process group ID of the parent but gets a new process ID, so we’re guaranteed that the child is not a process group leader. This is a prerequisite for the call to setsid that is done next.

    调用 fork 创建子进程并使父进程退出,将守护进程放入后台运行。这个操作主要有两个目的。首先,如果守护进程是通过一个简单的 Shell 命令创建的,那么父进程结束时便会让 Shell 一并将守护进程也结束(注:在终端中 ctrl+c/delete 会向前台进程组所有进程发送中断信号,若父进程退出那么子进程便会被 init 进程接管进入后台运行。);其次,子进程继承得到父进程的 “进程组ID” 同时也获得了一个新的进程号,这样便能保证子进程不是 “进程组组长” ,这是下一步 setsid 操作的前提(注:只有当前进程不是进程组组长时,才能调用 setsid 创建新会话。)。

  3. Call setsid to create a new session. The three steps listed in Section 9.5 occur.The process (a) becomes the leader of a new session, (b) becomes the leader of a new process group, and (c) is disassociated from its controlling terminal.

    调用 setsid 创建一个新会话,这个调用实际会执行 3 个操作:(a) 使当前进程称为新会话的 “会话首进程”;(b) 使当前进程称为新 “进程组组长”;(c) 使当前进程脱离控制终端。(注:第 2 个操作使当前进程进入后台运行,这个操作接着使进程脱离原来的进程组、控制终端和会话。

    在基于 System V 的系统中,有人建议再一次调用 fork 并使父进程退出,而新产生的进程将会成为真正的守护进程。这一步骤将保证守护进程不是一个 “会话首进程” ,进而阻止它重新申请获取一个控制终端。另外一种阻止守护进程重新申请获取控制终端的方法是任意时刻打开一个终端设备的时候明确指定 O_NOCTTY 标识(注:调用 open() 函数打开文件时,若文件是一个终端,指定 O_NOCTTY 标识后便不会让此终端成为该进程的控制终端。 ) 。

  4. Change the current working directory to the root directory. The current working directory inherited from the parent could be on a mounted file system. Since daemons normally exist until the system is rebooted, if the daemon stays on a mounted file system, that file system cannot be unmounted.

    Alternatively, some daemons might change the current working directory to a specific location where they will do all their work. For example, a line printer spooling daemon might change its working directory to its spool directory.

    将当前工作目录切换到系统目录下。这是因为继承自父进程的当前工作目录可能是一个挂载的文件系统,而守护进程通常会一直运行到系统重启。如果守护进程工作在一个挂载的文件系统上,那么这个文件系统便不能被卸载。

    另外,有些守护进程会把当前工作目录切换到特定的路径下,并在这些路径下完成它们的工作。例如,行式打印机守护进程通常会将当前工作目录切换到 spool 目录。

  5. Unneeded file descriptors should be closed. This prevents the daemon from holding open any descriptors that it may have inherited from its parent (which could be a shell or some other process). We can use our open_max function (Figure 2.17) or the getrlimit function (Section 7.11) to determine the highest descriptor and close all descriptors up to that value.

    关闭不必要的文件描述符。这将阻止守护进程保持任何从父进程(Shell 或者其他进程)进程而来的文件描述符。我们可以使用 open_max 或 getrlimit 函数来查找当前优先级最高的文件描述符并关闭此描述符之下的所有其他描述符。(注:保持打开的文件描述符将会占用系统资源并使某系文件不能被卸载。

  6. Some daemons open file descriptors 0, 1, and 2 to /dev/null so that any library routines that try to read from standard input or write to standard output or standard error will have no effect. Since the daemon is not associated with a terminal device, there is nowhere for output to be displayed, nor is there anywhere to receive input from an interactive user. Even if the daemon was started from an interactive session, the daemon runs in the background, and the login session can terminate without affecting the daemon. If other users log in on the same terminal device, we wouldn’t want output from the daemon showing up on the terminal, and the users wouldn’t expect their input to be read by the daemon.

    有些守护进程会将标准输入、标准输出、标准错误描述符重定向到 /dev/null,这样一来任何尝试从标准输入、标准输出或者标准错误读取守护进程信息的操作都会失败。因为守护进程不与任何终端设备关联,便没有地方显示输出或者接受用户输入。即使守护进程是由一个交互式会话创建,但由于其在后台运行,便不会受登录会话结束的影响;如果有其他用户通过当前终端登录,我们也不希望守护进程的输出出现在终端上,并且该用户的任何输入也不会被守护进程接收。

  7. 注:引用自 《linux系统编程之进程(八):守护进程详解及创建,daemon()使用》)处理 SIGCHLD 信号。这不是一个必须的操作,但对于某些进程,特别是服务器进程(守护进程)往往在请求到来时生成子进程处理请求。如果父进程不等待子进程结束,子进程将成为僵尸进程(zombie )从而占用系统资源。如果父进程等待子进程结束,将增加父进程的负担,影响服务器进程的并发性能。在 Linux 下可以简单地将SIGCHLD 信号的操作设为 SIG_IGN: signal(SIGCHLD,SIG_IGN)。这样,内核在子进程结束时不会产生僵尸进程。这一点与 BSD4 不同,BSD4 下必须显式等待子进程结束才能释放僵尸进程。

Read more »